The Ultimate German Hang Tutorial: Build Bulletproof Shoulders
The German Hang is more than just a cool-looking gymnastic skill; it is one of the most effective tools for developing elite-level shoulder mobility and biceps tendon strength. Often used as a prerequisite for advanced movements like the Back Lever, the German Hang places your shoulders in a position of maximum extension, stretching the chest, deltoids, and biceps simultaneously.
However, because it is an “extreme” stretch, it must be approached with caution to avoid injury. In this guide, we’ll break down the technique, safety protocols, and a step-by-step progression based on the principles of safe gymnastic training.
Why Train the German Hang?
- Bicep Tendon Health: It strengthens the connective tissues in the elbows and shoulders, which are often the “weak links” in calisthenics.
- Massive Shoulder Extension: Most people have tight shoulders from sitting. This move opens the chest and increases the range of motion behind your body.
- Back Lever Preparation: It is the foundational “bottom” position for the Back Lever.
Recommended Skills Before Doing German Hangs
Before attempting the German hang, you should be able to:
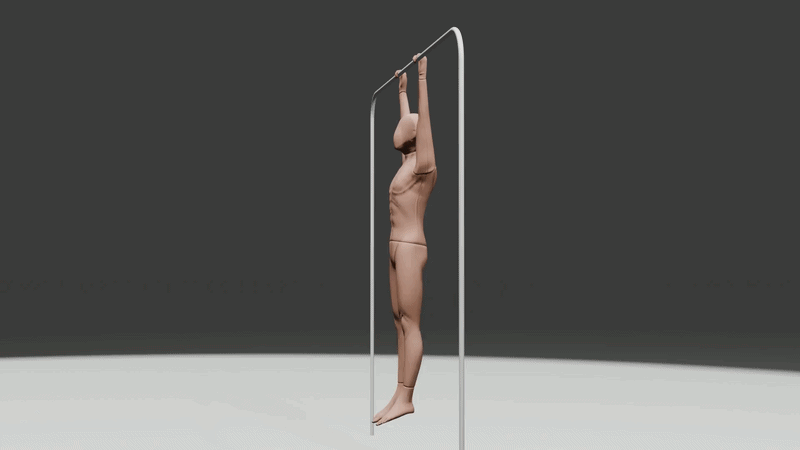
- Dead Hang: 45 seconds (comfortable).
- Active Arch Hang: 20 seconds (pulling shoulder blades down and back).
- Knees-to-Chest: 10 controlled reps (to ensure you can get your legs over the bar).
Step-by-Step German Hang Progressions
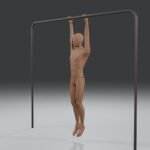
- The “Skin-the-Cat” (Partial Range). This is the dynamic version of the German Hang and the best way to test the waters.
- The Move: Hang from the bar, pull your knees to your chest, and tuck your head back as your feet pass between your arms.
- The Limit: Only go as far back as you feel a light stretch. Do not let go of the bar! Pull yourself back to the starting position.
- Goal: 3 sets of 5 controlled “tucks.”
- The Low Bar “Step-Through”. If you have access to a lower bar (waist or chest height), use it to build confidence.
- The Move: Stand under the bar and grip it with a narrow, overhand grip. Step your feet through your arms while keeping your hands on the bar.
- The Weight: Use your feet to support 80% of your weight. Slowly lean forward to feel the stretch in your chest and biceps.
- Goal: 3 sets of 30-second holds with minimal foot support.
- The “Tucked” German Hang. Once you can pass through the bar on a high bar, don’t drop your legs yet.
- The Move: Pass your legs through your arms and let your hips drop toward the floor, but keep your knees tucked tightly to your chest.
- The Benefit: This keeps your center of mass close to the bar, making it much easier to pull back out if you feel a “twinge.”
- Goal: 3 sets of 15 seconds.
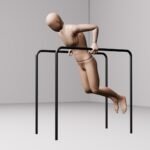
- The Full German Hang (Feet Down)
- The Move: From the tuck, slowly extend your legs toward the ground.
- The Focus: Aim to get your toes as close to the floor as possible. Imagine someone is pulling your feet toward the ground while your hands stay glued to the bar.
Safety: How Not to Get Injured During German Hang
Yes, the German hand looks dangerous and a bit sketchy and many are worried they will get injured, but don’t worry. Follow these tips to not get injured.
- Grip Width is Everything
- On a bar, a narrower grip (slightly inside shoulder width) is actually safer for the shoulders during a German Hang. A wide grip puts the shoulder joint in an awkward, compromised position at the bottom of the hang.
- The “Elbow Lock” Rule
- Never allow your elbows to “soften” or bend. Keeping the arms dead straight ensures the tension is held by the muscles and the long-head of the bicep tendon rather than putting sheer force on the elbow joint itself.
- Don’t “Ego-Hang”
- On rings, you can rotate your palms to relieve pressure. On a bar, you can’t. If you feel a sharp, “electric” pain in your bicep or front deltoid, stop immediately. That is a sign that your connective tissue isn’t ready for that load yet.
- The “Release” Myth
- Never let go of the bar at the bottom. Some beginners get scared and let go. Dropping from a German Hang puts your shoulders in a dangerous, unweighted position suddenly. Always pull back through or lower your feet to a box/floor.
Why German Hang On Bar is Harder Than Rings
On a bar, your palms are stuck in a pronated (overhand) position. As you rotate into the German hang, this forces your shoulders into extreme internal rotation. If you find the bar too painful, it’s a sign that your chest (pectoralis minor) is too tight. Spend extra time on doorway chest stretches before you go a and do German hang from a bar.
Difference Between German Hang and Skin The Cat
In the world of calisthenics, these two terms are used almost interchangeably because they involve the exact same position, but they serve two different purposes.
The simplest way to think about it is: The German Hang is a static hold in the middle of skin the cat, while the skin the cat is the whole movement from start to finish.
The German Hang – Static Hold
The German Hang is a static isometric hold. It is the specific position where you are hanging with your feet pointing toward the ground behind your back. It is the middle way of the full skin the cat exercise.
- The Goal: Mobility and endurance.
- The Focus: You are staying still to let gravity stretch your chest, shoulders, and bicep tendons.
- Training Benefit: It builds “passive” and “active” flexibility. It prepares your connective tissue for the massive tension of a Back Lever.
Skin the Cat – Full Movement
Skin the Cat is a dynamic exercise that includes the German Hang as its middle phase. It is the full rotation from a normal hang, through an inverted hang, into a German Hang, and back again.
- The Goal: Strength and coordination.
- The Focus: The “pull-back.” The hardest part of Skin the Cat isn’t hanging at the bottom; it’s the core and lat strength required to pull your body back over the bar to the starting position.
- Training Benefit: It builds incredible “through-the-range” strength. It teaches your nervous system how to stay strong while your shoulders are in a compromised, stretched position.
| Feature | German Hang | Skin the Cat |
| Type | Static (Stay still) | Dynamic (Moving) |
| Primary Focus | Maximum Shoulder Extension | Core & Lat “Pull-through” Strength |
| Difficulty | Easier (Passive) | Harder (Active) |
| Why do it? | To stretch and prep tendons. | To build functional pulling power. |
The Relationship Between the Two
You cannot do a proper Skin the Cat without passing through a German Hang.
Usually, a coach will have you start with the Skin the Cat but only go halfway (until you feel a stretch). Once you are comfortable, you stop at the bottom to perform a German Hang for 10–20 seconds. Then, you finish the rep by pulling back.
If you can’t pull back out of a German Hang, you haven’t “mastered” it yet. Being able to “Skin the Cat” back to the start is the safety net that proves your shoulders are strong enough to handle the stretch.