The hollow body hold is one of the most effective core exercises you can do with no equipment. It looks simple, but most beginners struggle with it because it requires full-body tension and control.
If done correctly, it builds a strong, stable core that carries over to almost every other exercise—especially push-ups, squats, and advanced bodyweight movements.
What is the hollow body position?
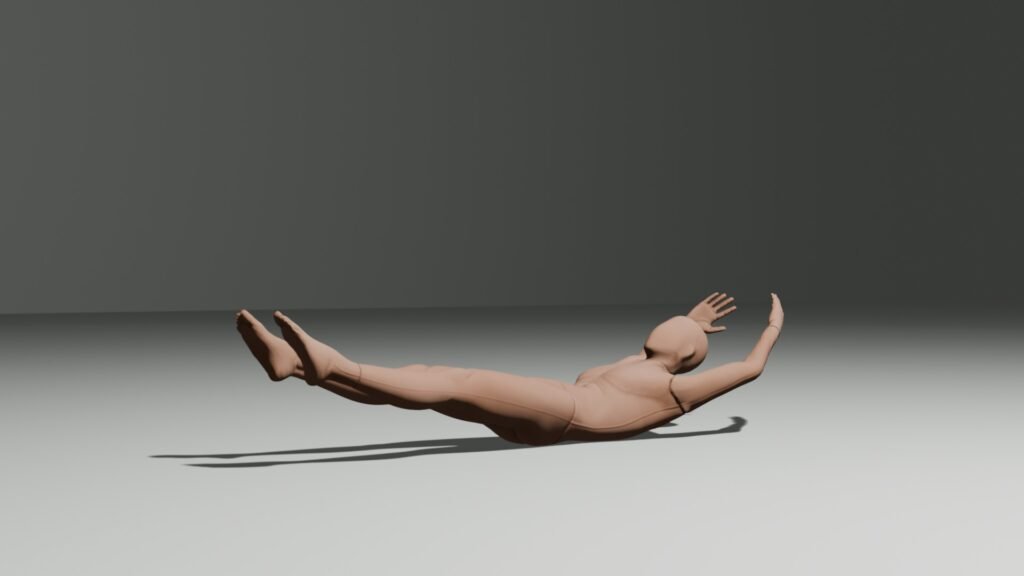
The hollow body position is a core exercise where you lie on your back and hold your body in a slightly curved position, keeping your lower back pressed into the floor.
It trains:
- Core (abs and deep stabilizing muscles)
- Hip flexors
- Shoulder stability
Why the hollow body hold is so effective
1. Builds real core strength
This isn’t just about visible abs—it trains the muscles that stabilize your entire body.
2. Improves body control
You learn how to create full-body tension, which helps in exercises like push-ups and squats.
3. Protects your lower back
A strong core helps reduce stress on your spine during training.
4. Transfers to other exercises
If you can hold a strong hollow position, your form improves in:
How to hold the hollow body position (step-by-step)
Step 1: Lie on your back
- Arms extended overhead
- Legs straight
Step 2: Press your lower back into the floor
This is the most important part.
- Flatten your lower back against the ground
- There should be no gap
Step 3: Lift your shoulders and legs slightly
- Raise your shoulders just off the floor
- Lift your legs a few inches
Step 4: Create a “banana shape”
Your body should form a slight curve:
- Lower back stays pressed down
- Core stays tight
Step 5: Hold the position
- Keep breathing
- Stay tight
- Don’t let your lower back lift
Common mistakes
1. Lower back lifting off the floor
This removes the core tension and can strain your back.
👉 Fix: Bring your legs higher or bend your knees.
2. Holding your breath
You need to breathe while maintaining tension.
3. Going too advanced too soon
Straight legs and arms overhead are difficult for beginners.
👉 Scale it down first.
Beginner progressions (start here)
Level 1: Tucked hollow hold
- Bend your knees
- Keep arms by your sides
- Hold 15–30 seconds
Level 2: One leg extended
- One leg straight, one bent
- Switch sides
Level 3: Both legs extended (arms forward)
- Arms reach toward your knees
Level 4: Full hollow body hold
- Legs straight
- Arms overhead
How long should you hold it?
Start with:
- 15–20 seconds
Build up to:
- 30–45 seconds
- 60 seconds (advanced beginner level)
How to add it to your workouts
Use it 2–3 times per week:
- 3 sets per workout
- Rest 30–60 seconds between sets
You can include it in a routine like this:
👉 Beginner Bodyweight Workout Plan (No Equipment Needed)
Why beginners should not skip this exercise
Most beginners focus only on visible exercises like push-ups and squats—but ignore core stability.
That leads to:
- Poor form
- Slower progress
- Higher injury risk
The hollow body hold fixes that by building a strong foundation.
Final advice
Don’t rush this exercise. If you feel your lower back lifting, scale it down.
A shorter, correct hold is far better than a longer, sloppy one.
Master this position, and you’ll notice improvements across all your workouts.