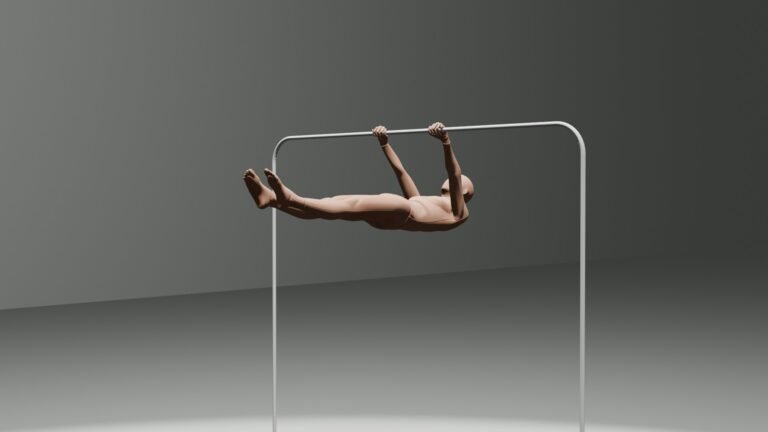

Inverted rows are one of the most accessible bodyweight exercises for building back and arm strength. Unlike pull-ups, you can adjust the difficulty simply by changing your body angle.
This makes them useful for beginners who can’t perform pull-ups yet, but they’re also a great accessory exercise for more experienced calisthenics athletes.
I’ve used inverted rows both during my weightlifting days and in calisthenics training. I particularly enjoy performing them after pull-ups, when I’m too fatigued to continue with full bodyweight repetitions but still want to train my back.
You can perform inverted rows using a secure horizontal bar or properly installed gymnastics rings, and you don’t need a complicated workout program to benefit from them.
Quick answer: To perform an inverted row, hang underneath a secure bar with your feet on the floor. Keep your body aligned, pull your chest toward the bar by driving your elbows back, and lower yourself under control. Make the exercise easier by using a more upright body position.
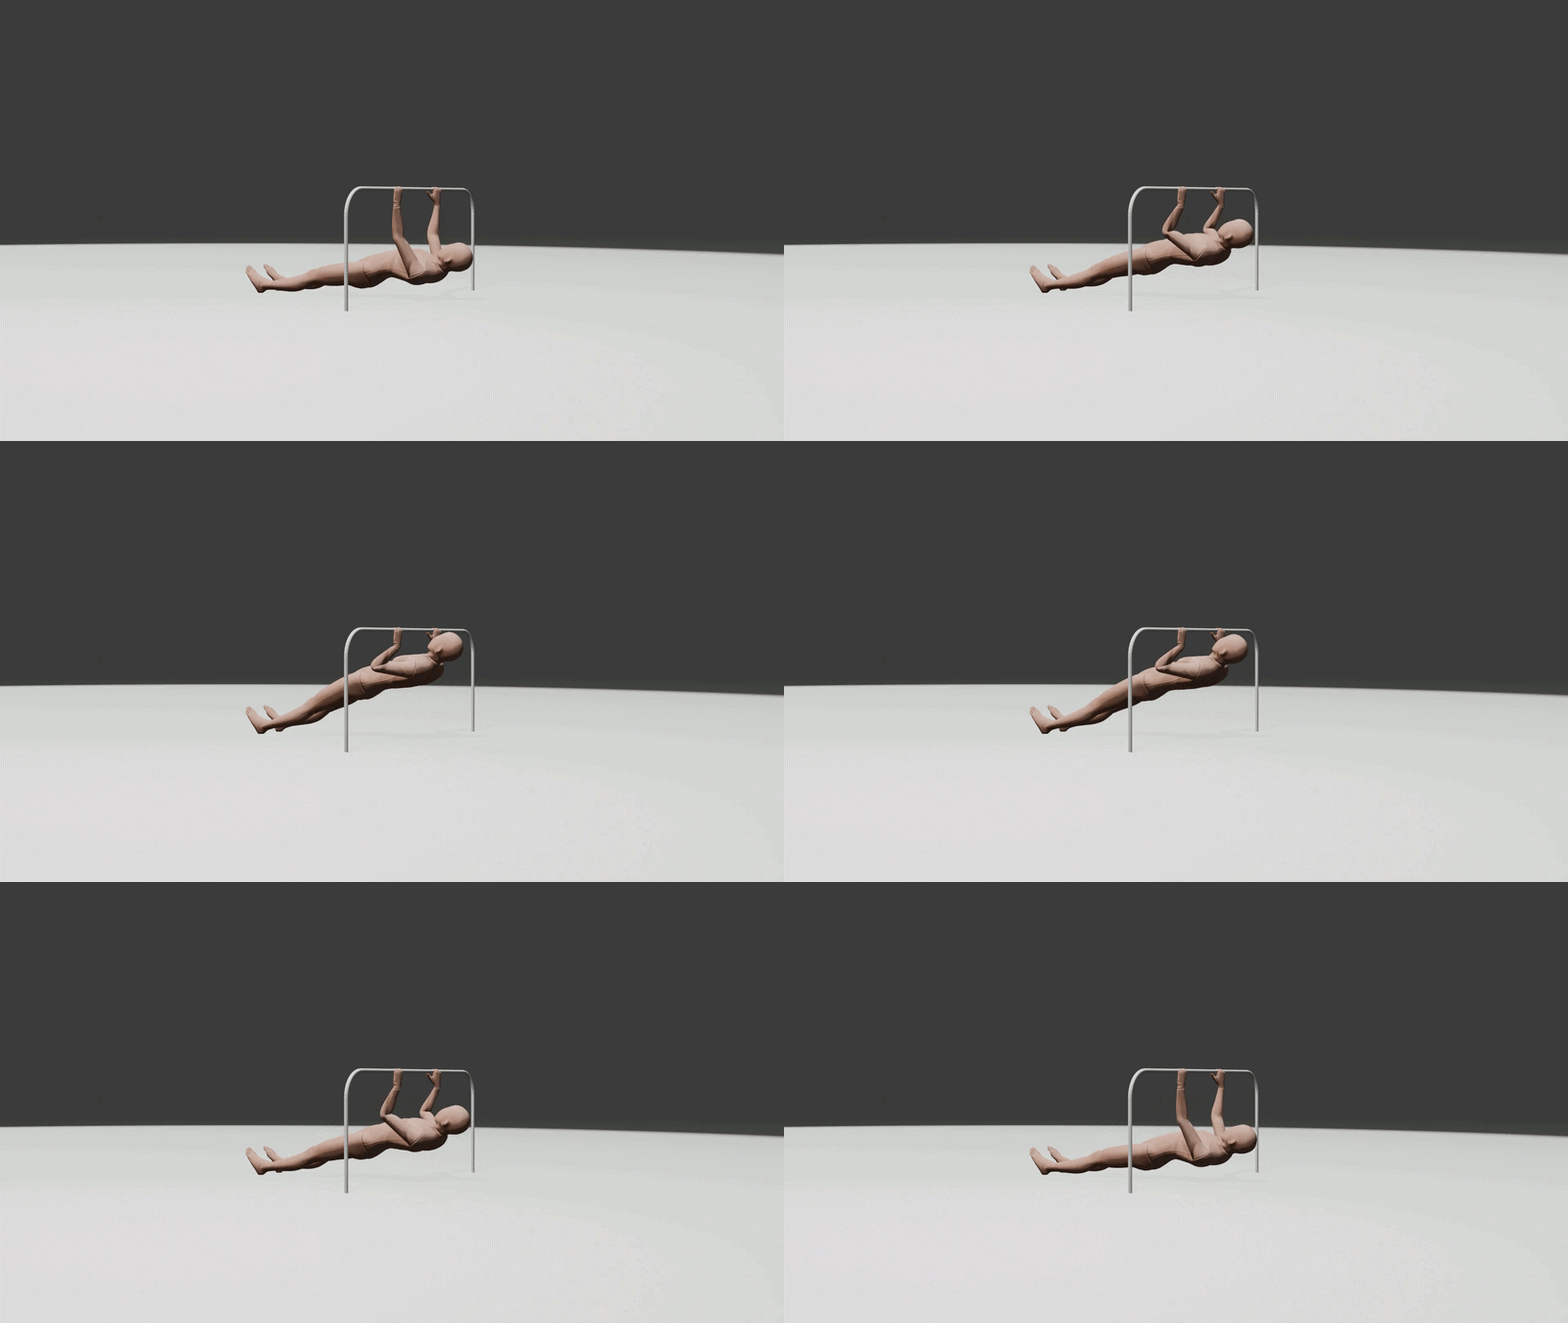
Quick Inverted Row Form Check
Use these five cues whenever you’re practicing inverted rows:
- Grip: Hold a secure bar around shoulder-width apart or slightly wider.
- Body: Keep your head, torso, hips, and legs aligned. Bend your knees if using an easier variation.
- Core: Brace your abs and glutes to prevent your hips from dropping.
- Pull: Drive your elbows back and bring your chest toward the bar.
- Lower: Extend your arms under control without dropping your hips or using momentum.
My main tip: Keep your core engaged throughout the movement. I personally focus on squeezing my abs to stop my lower body from sagging, particularly when repetitions become difficult.
Common Problems: What Should You Try?
| Your problem | Practical solution |
|---|---|
| Can’t pull your chest toward the bar | Raise the bar or make your body more upright |
| Exercise feels too easy | Move your feet forward to make your body more horizontal |
| Hips keep dropping | Brace your abs and glutes or use a less demanding angle |
| Your arms tire before your back | Try driving your elbows backward and adjusting the difficulty |
| Can’t maintain a straight body | Bend your knees and practice keeping your torso aligned |
| You swing during repetitions | Slow down and reduce the difficulty |
| Ring rows feel unstable | Adjust the body angle or use a fixed bar |
| Unsure when to progress | Increase difficulty once your current sets feel consistently controlled |
The most useful adjustment is often simply changing the angle of your body.
You don’t need to move to a completely different exercise every time you encounter a problem.
Table of Contents
How to Do Inverted Rows With Proper Form
Inverted rows are sometimes called Australian pull-ups, bodyweight rows, or horizontal rows.
The basic movement involves pulling your body toward a bar while your feet remain supported on the floor.
Step 1: Set Up a Secure Bar
Use a fixed horizontal bar, a properly secured barbell in a rack, or suitable gymnastics rings.
For a beginner, a higher bar usually allows an easier, more upright position.
Before starting, make sure the bar cannot roll, move, or become dislodged under your weight.
Position yourself underneath the bar and grab it with an overhand grip.
Your hands can be around shoulder-width apart or slightly wider.
Step 2: Position Your Body
Extend your arms while keeping your feet firmly on the floor.
For a standard straight-leg inverted row, support yourself on your heels with your legs extended.
Your shoulders, hips, and legs should form a relatively straight line.
Brace your abdominal muscles and glutes.
Think about holding a plank underneath the bar.
If this is too difficult, bend your knees and place your feet flat on the floor.
The bent-knee variation is a perfectly valid starting point.
Step 3: Pull Your Chest Toward the Bar
Begin pulling by bending your elbows and moving your upper arms backward.
Think about bringing your chest toward the bar rather than reaching toward it with your chin.
Allow your shoulder blades to move naturally as you pull.
Your upper-back muscles help bring your shoulder blades toward each other, while your arms and other back muscles contribute to lifting your body.
Keep your torso controlled throughout the movement.
Step 4: Reach the Top Position
Pull your chest as close to the bar as your strength and setup comfortably allow.
You may lightly touch the bar with your chest if your proportions and setup permit it.
Don’t force your shoulders into an uncomfortable position or stretch your neck forward just to reach the bar.
You can briefly pause at the top if that helps you maintain control.
Step 5: Lower Yourself Under Control
Gradually straighten your arms and return to the starting position.
Allow your shoulder blades to move naturally as your arms extend.
Keep your abs engaged so your hips don’t suddenly drop.
You don’t need to follow an exact three-second tempo.
A smooth, controlled movement is enough.
Step 6: Repeat Without Losing Your Body Position
Perform additional repetitions while maintaining consistent technique.
If your hips begin dropping, your torso starts swinging, or your range of motion becomes much shorter, consider ending the set or using an easier angle.
A good inverted row should feel like a controlled pulling movement—not an attempt to swing your chest into the bar.
What Muscles Do Inverted Rows Work?
Inverted rows are a compound upper-body pulling exercise.
They mainly train the muscles of your back and arms, while your core and lower body help keep you stable.
| Muscle group | Role during inverted rows |
|---|---|
| Latissimus dorsi (lats) | Helps move your upper arms backward |
| Rhomboids | Help move and control your shoulder blades |
| Middle trapezius | Contributes to upper-back and shoulder-blade movement |
| Rear deltoids | Assist with moving your upper arms backward |
| Biceps and other elbow flexors | Bend your elbows as you pull |
| Forearms | Maintain your grip |
| Abdominals and glutes | Stabilize your body position |
Upper Back
Inverted rows train several muscles around your shoulder blades, including the rhomboids and trapezius.
These muscles contribute to controlling your shoulder blades as your upper arms move backward.
This makes inverted rows a useful horizontal pulling exercise to include alongside other back exercises.
Lats
Your latissimus dorsi muscles also contribute to the pulling movement.
Although pull-ups and rows involve different movement directions, both can challenge your lats.
You don’t need to choose between horizontal and vertical pulling exercises.
Biceps and Forearms
Your biceps and other elbow-flexing muscles help bend your arms as you pull toward the bar.
Your forearms work to maintain your grip.
If you feel inverted rows strongly in your arms, that doesn’t necessarily mean your back muscles aren’t working.
Core and Glutes
Your abs and glutes help keep your body from sagging toward the floor.
This is particularly noticeable with straight-leg inverted rows performed at a challenging angle.
If keeping your torso aligned is difficult, bend your knees or raise the bar to reduce the challenge.
For more information about maintaining a stable body position, see our Plank Exercise Guide.
Inverted Row Progressions: Easy to Hard
One of the biggest advantages of inverted rows is how easily you can adjust their difficulty.
You don’t need to purchase additional weights or learn a completely different technique.
In many cases, changing your body angle is enough.
Inverted Row Progression Table
| Variation | Difficulty | What changes? |
|---|---|---|
| High-Bar Row | Easier | Your body remains more upright |
| Bent-Knee Inverted Row | Easier to moderate | Bent knees change leverage and reduce the challenge |
| Straight-Leg Inverted Row | Moderate | Your body stays in a longer, straighter position |
| Low-Bar Inverted Row | Harder | Your body becomes more horizontal |
| Paused Inverted Row | Harder | You hold the top position briefly |
| Feet-Elevated Inverted Row | Usually harder | Your feet are supported higher |
| Advanced Weighted or One-Arm Progressions | Advanced | Additional resistance or greater one-arm demand |
These are general difficulty categories, not a mandatory progression sequence.
1. High-Bar Inverted Rows
Start with the bar positioned relatively high.
Walk your feet forward until your arms extend and your body leans backward at a manageable angle.
Because your body is more upright, you’ll generally support less of your weight through your arms.
Perform controlled repetitions while keeping your body aligned.
Good for: Beginners and people who cannot yet perform lower-angle inverted rows.
2. Bent-Knee Inverted Rows
Position yourself underneath a secure bar with your knees bent and feet flat on the floor.
Keep your torso and thighs aligned as you pull.
This variation changes your leverage and can make it easier to maintain control.
Good for: Building strength and learning the movement without using a fully extended body position.
3. Straight-Leg Inverted Rows
Extend your legs and keep your heels on the floor.
Maintain a straight line from your shoulders to your heels.
Pull your chest toward the bar and lower with control.
Good for: Developing stronger horizontal pulling with more bodyweight resistance.
4. Lower-Bar Inverted Rows
To increase the difficulty, use a lower bar and move your feet farther forward.
This places your body closer to horizontal.
As your body becomes more horizontal, the pulling movement generally becomes more demanding.
Good for: People who can perform straight-leg rows comfortably at a higher angle.
5. Paused Inverted Rows
Once you’re comfortable with regular inverted rows, try briefly pausing near the top.
Pull your chest toward the bar and hold the position for approximately one second before lowering.
This can help you practice control without immediately changing to a much harder variation.
Good for: Improving control and making familiar repetitions more challenging.
6. Feet-Elevated Inverted Rows
Place your heels on a stable, appropriately positioned platform while performing an inverted row.
Depending on the setup, this can place your body in a more demanding position.
You should already be comfortable with standard inverted rows before experimenting with this variation.
Ensure the platform cannot slide or tip.
Good for: More experienced athletes looking for a harder bodyweight row.
I haven’t personally tried feet-elevated inverted rows yet, so I wouldn’t claim they are my preferred progression. They’re simply another option worth considering when regular rows become too easy.
7. Advanced Inverted Row Variations
Eventually, you can explore weighted rows, archer rows, or assisted one-arm rows.
These variations require more strength, control, or equipment.
They’re not necessary for most people who want to improve general back strength.
You can make excellent progress by adjusting your angle and gradually increasing repetitions.
How to Make Inverted Rows Easier or Harder
If there’s only one progression principle you remember, make it this:
More upright = generally easier. More horizontal = generally harder.
For example, if you can perform 3 sets of 12 inverted rows comfortably with your body at a moderate angle, experiment with a slightly more horizontal position.
You may initially complete only 6–8 clean repetitions.
That’s fine.
You have made the exercise harder without adding weight.
When Should You Progress?
A practical approach is to choose a variation that allows approximately 6–12 controlled repetitions.
When you can consistently complete around 3 sets of 10–12 with good control, try adjusting your angle.
You don’t have to reach exactly 12 repetitions before progressing.
The important thing is that the harder variation remains controlled.
Keep your feet positioned consistently if you want to compare your performance between workouts.
My Experience: Inverted Rows as a Back Finisher
I’ve performed inverted rows occasionally for years, first while weightlifting and later during calisthenics training.
I originally used them as an additional back exercise after heavier pulling movements.
That approach carried over into my calisthenics workouts.
Sometimes, after completing my pull-up sets and reaching the point where I couldn’t perform more clean pull-ups, I’d switch to inverted rows.
Because inverted rows are easier for me, I could continue training my back and finish the workout with a strong muscular pump.
I usually perform around 3 sets of 10 repetitions, sometimes pushing the final set particularly hard.
What Has Worked for Me?
I don’t follow one exact body angle every time.
Instead, I adjust the position until the movement feels comfortable and challenging enough for the session.
My biggest technique focus is keeping my lower body straight.
I consciously brace my abs and core so my hips don’t drop while pulling.
This is especially useful when I become tired near the end of a set.
Do I Still Use Inverted Rows?
Yes, occasionally.
However, they’re no longer a major part of every pulling workout.
As my pull-up strength has improved, I’ve become better at getting demanding training from pull-ups themselves.
I therefore don’t always need inverted rows afterward.
But I still think they’re a useful option when I want additional back work.
My advice: Don’t think of inverted rows as something you must stop doing once you can perform pull-ups. Their adjustable difficulty makes them useful both for learning to pull and for adding extra training after harder exercises.
Inverted Rows vs. Pull-Ups: What’s the Difference?
Inverted rows and pull-ups both train your back and arms, but they involve different pulling directions.
| Feature | Inverted Rows | Pull-Ups |
|---|---|---|
| Pulling direction | Mostly horizontal relative to your torso | Mostly vertical |
| Foot support | Feet normally remain supported | Body hangs freely |
| Difficulty adjustment | Change your angle, knee position, or loading | Use assistance or additional weight |
| Beginner accessibility | Often easier to scale | Full repetitions can be challenging |
| Main training use | Horizontal pulling strength | Vertical pulling strength |
Do Inverted Rows Help You Get Better at Pull-Ups?
They can help develop several muscles used during pull-ups, including your lats, upper back, and elbow flexors.
However, inverted rows don’t perfectly replicate the vertical pulling movement.
If your main goal is achieving your first pull-up, combine inverted rows with assisted pull-ups or other suitable vertical pulling exercises.
See our Beginner Pull-Up Progression Guide for a complete approach.
Can Inverted Rows Replace Pull-Ups?
They can provide useful back training when pull-ups aren’t available, but they aren’t an identical replacement.
If possible, training both horizontal and vertical pulling movements gives you more variety in your back training.
For regular pull-up technique and progressions, see our How to Do Pull-Ups Guide.
Inverted Rows on a Bar vs. Gymnastics Rings
Inverted rows can be performed using either a fixed bar or appropriately installed gymnastics rings.
The basic pulling movement is similar, but the setup feels different.
| Feature | Fixed Bar | Gymnastics Rings |
|---|---|---|
| Hand position | Usually fixed | Can rotate naturally |
| Setup stability | Generally more stable | Rings can move independently |
| Difficulty adjustment | Change bar height and body angle | Change ring height and body angle |
| Equipment requirements | Secure horizontal bar | Rings, straps, and suitable anchor |
| Best reason to choose it | Simple, repeatable pulling setup | Adjustable grip and versatile training |
My Experience: Bar vs. Rings
I usually perform inverted rows on a fixed bar.
I’ve also tried them on gymnastics rings.
For me, ring rows feel a little different and sometimes slightly harder.
I also don’t get quite the same back pump as I do with a fixed bar.
That doesn’t mean ring rows are less effective.
I simply prefer the feeling of a stable bar when performing inverted rows.
Your experience may be different depending on your setup, grip, and familiarity with rings.
Are Gymnastics Rings Worth Buying?
If you want to perform inverted rows at home and already have a suitable overhead anchor, gymnastics rings can be useful equipment.
They’re adjustable and can also be used for other bodyweight exercises.
Look for:
- Clear weight ratings for the rings, straps, and anchor system.
- Strong, adjustable straps.
- Secure buckles.
- Comfortable handles.
- Installation instructions appropriate for your setup.
Make sure the anchor is designed to support the forces involved. Don’t assume an ordinary doorway fixture, loose bar, or piece of household furniture is safe for suspended exercises.
Optional equipment: [Insert your Amazon Associates link to suitable gymnastics rings here.]
As an Amazon Associate I earn from qualifying purchases.
You don’t need rings if you already have access to a suitable bar.
For more equipment options, see our Home Pull-Up Bar and Gymnastics Rings Guide.
Beginner Inverted Row Workout
You don’t need an elaborate program to build strength with inverted rows.
For many beginners, practicing two or three times per week is a reasonable starting point.
Allow recovery between demanding pulling sessions, especially if you’re also training pull-ups, chin-ups, or other back exercises.
Workout A: Beginner Back Strength
| Exercise | Sets and reps |
|---|---|
| High-Bar or Bent-Knee Inverted Rows | 3 × 6–10 |
| Slightly Easier Inverted Rows, optional | 2 × 8–12 |
| Plank | 2 × 15–30 seconds |
Rest approximately 1–2 minutes between sets, or longer if needed to maintain good technique.
Main goal: Build controlled repetitions and gradually make your body position more horizontal.
If you cannot complete six clean repetitions, use a higher bar or an easier angle.
Workout B: Stronger Inverted Rows
| Exercise | Sets and reps |
|---|---|
| Straight-Leg Inverted Rows | 3 × 8–12 |
| Optional Paused Rows | 2 × 5–8 |
Keep the exercise challenging without sacrificing body position.
When the regular sets become comfortable, gradually lower the bar or try a short pause at the top.
Main goal: Increase difficulty while maintaining a consistent range of motion.
Workout C: Inverted Rows After Pull-Ups
This is closer to how I personally use the exercise.
| Exercise | Sets and reps |
|---|---|
| Pull-Ups | Your normal working sets |
| Inverted Rows | 2–3 × 8–12 |
Complete your pull-ups first if they’re your main strength goal.
Then use inverted rows for additional pulling work.
You can occasionally push the final row set close to your technical limit if your recovery allows.
However, you don’t need to train every set to failure.
Main goal: Add productive back training without unnecessarily exhausting yourself.
Common Inverted Row Mistakes
1. Letting Your Hips Drop
If your hips sag during the row, your body position changes and it becomes harder to perform consistent repetitions.
Fix: Brace your abs and glutes. If necessary, use a higher bar or bent-knee variation.
This is the main technique cue I personally focus on during inverted rows.
2. Reaching With Your Chin
Moving your head toward the bar can make a repetition appear deeper without actually pulling your chest much higher.
Fix: Keep your neck in a natural position and focus on bringing your torso toward the bar.
3. Using Your Hips to Swing Upward
Driving your hips upward can create momentum that makes the pulling movement easier.
Fix: Slow down and choose an angle you can control.
4. Pulling With an Inconsistent Range of Motion
If your first repetitions bring your chest close to the bar but later repetitions stop halfway, your effective range has changed.
Fix: Reduce the difficulty or stop the set when your technique deteriorates.
5. Lowering Too Quickly
Dropping suddenly from the top reduces your control.
Fix: Lower yourself smoothly and maintain tension through your body.
6. Forcing an Uncomfortable Position
The same grip width and body angle won’t feel ideal for everyone.
Fix: Experiment with a slightly different grip or bar height. Stop if a movement causes pain rather than pushing through it.
Frequently Asked Questions
Are Inverted Rows Good for Beginners?
Yes. Inverted rows are often easier to scale than full pull-ups because you can adjust your body angle and keep your feet supported.
Start with a higher bar or bent knees if necessary.
Are Inverted Rows Easier Than Pull-Ups?
For many people, yes.
A typical inverted row allows you to support part of your weight through your feet, while a full pull-up requires you to lift your body without that support.
However, harder inverted row variations can still be demanding.
How Many Inverted Rows Should I Do?
A practical starting point is 2–3 sets of 6–12 controlled repetitions.
Adjust the difficulty to your current strength.
There is no universal repetition number everyone must reach.
Should Your Chest Touch the Bar?
You can aim to bring your chest close to the bar, and a light touch may be possible depending on your setup.
But don’t force contact by reaching with your neck or excessively changing your body position.
Should You Use an Overhand or Underhand Grip?
Both can work.
An overhand grip is a common starting point on a fixed bar.
An underhand grip changes the arm position and may feel different.
Use a comfortable grip that allows consistent repetitions.
Are Ring Rows Harder Than Bar Rows?
They can feel harder because the rings move independently, but the overall difficulty also depends on body angle, grip, and familiarity with the equipment.
I personally find ring rows a little harder, although I prefer performing inverted rows on a fixed bar.
Can You Build Muscle With Inverted Rows?
Yes. Inverted rows can contribute to back and arm muscle development when they provide an appropriate training challenge.
As you grow stronger, you can increase repetitions, adjust leverage, or use a harder variation.
Are Inverted Rows Good for Posture?
Inverted rows strengthen muscles involved in upper-body pulling and shoulder-blade movement.
However, they don’t automatically correct posture or prevent shoulder injuries.
Posture and discomfort are influenced by many factors, so avoid treating a single exercise as a guaranteed solution.
Can I Do Inverted Rows at Home?
Yes, if you have a suitable, securely installed bar, rings, or another device specifically designed to support suspended bodyweight exercises.
Avoid improvised setups that could slip, tip, or collapse.
Final Thoughts: Why Inverted Rows Are Worth Learning
Inverted rows are an accessible and highly adjustable exercise for developing upper-body pulling strength.
Beginners can use them to build back and arm strength before progressing toward harder movements.
More experienced athletes can use them as an accessory exercise after pull-ups or chin-ups.
That’s how I’ve often used them in my own workouts.
Even when I’ve reached the point where I can’t complete more clean pull-ups, I can still perform inverted rows and get additional back training.
My main advice is simple:
- Choose a body angle that matches your strength.
- Keep your core braced and your body aligned.
- Pull your chest toward the bar without swinging.
- Control the lowering movement.
- Gradually make the exercise harder as you improve.
You don’t need the hardest possible variation to get value from inverted rows. You need a variation you can control and gradually improve.
To build more complete pulling strength, combine them with our Pull-Up Guide or follow the Beginner Pull-Up Progression if you’re working toward your first repetition.